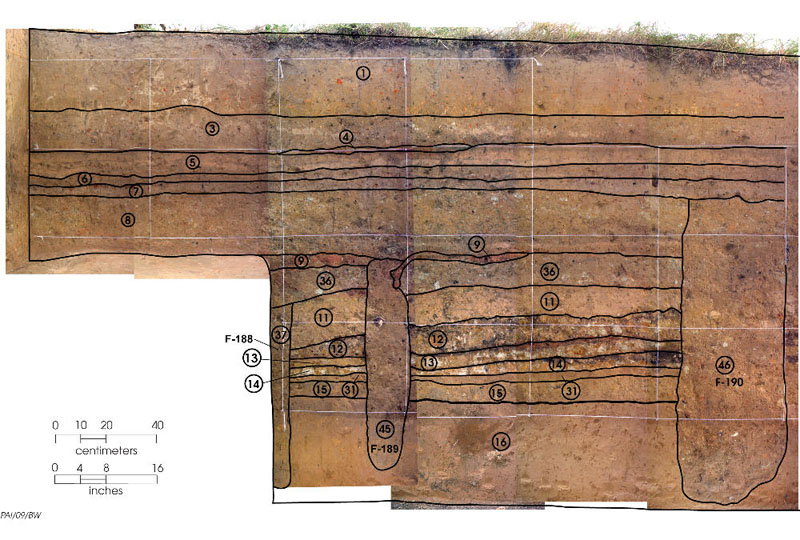
This photograph shows the part of the trench that was closest to the center of the mound. This is where the mound was tallest. The layer of dirt recorded as Zone 16 (the circled number toward the bottom) is the natural ground surface. The Caddo added all the layers above that, hauling the dirt in one basketful at a time. The first thing they did was spread 8–12 inches of yellowish brown dirt (Zones 15, 27, and 31) over the natural surface; they probably put a special building, either a temple or a house for a religious or political leader, on what was then a very low mound, and then dismantled it.
Next, they excavated a 4–8-inch-deep depression in what would become the center of the mound and put in a thin layer of yellow and white clay (Zone 14) to create a floor inside another building in the bottom of the depression. They burned this floor black and later added another floor on top of it (Zone 13), which they also burned. At the same time, they used yellow and white clay (Zone 13/14) to make a low ridge around the outside of the building and create a low platform beyond the ridge. These are not visible in this photograph, but they can be seen in photographs to the right of this one.
Then, they burned the building in the depression, probably intentionally, and the building collapsed (Zone 12). Next, they put up to 16 inches of brown dirt (Zones 11 and 36) over the central part of the mound to cover the building remains and create a flat surface. Burning of this surface (Zone 9) suggests the Caddo performed ceremonies on it. The tops of many features that appear to be holes that once held posts coincide with this surface, indicating that one or more buildings stood on it. Feature 189 (F-189) is one such posthole visible in this photograph, and others (Features 192, 193, 195, and 201) can be seen in other photographs as you move to the right. Feature 188, a little to the left of Feature 189, starts lower than Feature 189 and suggests that the mound builders may even have stopped long enough to put in posts after adding Zone 11 but before Zone 36. Because the top of Zone 11 is not burned, though, it does not look like they stopped for very long or did much on that surface. The post that was in Feature 188 may have been put there to mark some event or activity and then removed before more dirt was added.
After they abandoned the Zone 9 surface, the builders raised the mound several more times. Burned surfaces (Zone 4 is one, and the other is not visible in this photograph) mark two of these, and Feature 190, which appears to be a very large posthole, indicates a third between Zones 4 and 9. The top of the mound as finally constructed probably supported at least one more used surface, but it has been eroded away. The lack of posthole features in the upper part of the mound suggests that the Caddo may not have put special buildings on these later surfaces, at least not on the part of the mound where the archeologists put their trench.