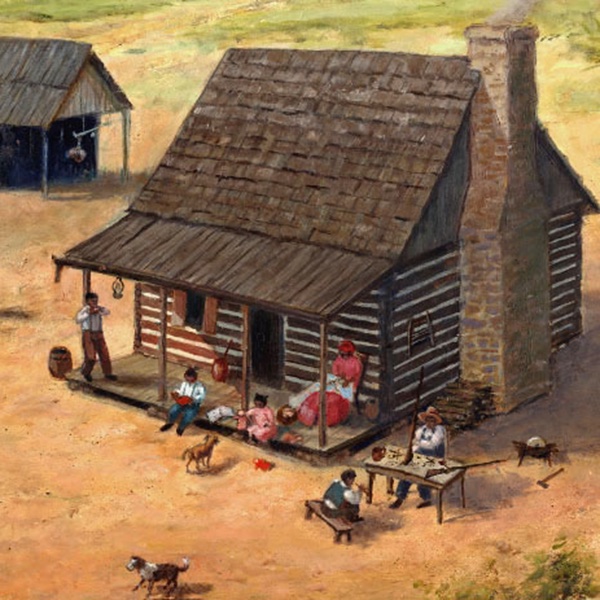
A New Life in Freedom: A Late 19th-Century African American Farmstead
Download lesson plan and included materials
Subject: Social Studies
Grade: 4th (can be adapted for 5th – 8th)
Author: Laine Liebick, revised by Jason Terry (2023)
Time Duration: Three mini-lessons of 45-90 minutes (can be modified)
Objective: This lesson contains three mini-lessons that may be used independently or together. In these lessons, students will explore a painting based on an actual farmstead site owned by formerly enslaved African Americans, Ransom and Sarah Williams, to learn about African American family life in 19th-century Texas. They will work in pairs or groups to learn about the various activities and chores shown in the painting, examine the artifacts found by archeologists representing these activities, and compose "snapshots" based on their findings.
TEKS: Social Studies, Grade 4
- (4A), describe the impact of the Civil War and Reconstruction on Texas
- (8A), describe ways people have adapted to and modified their environment in Texas, past and present, such as timber clearing, agricultural production, wetlands drainage, energy production, and construction of dams
- (19A), differentiate between, locate, and use valid primary and secondary sources such as technology; interviews; biographies; oral, print, and visual material; documents; and artifacts to acquire information about Texas
- (19B), analyze information by applying absolute and relative chronology through sequencing, categorizing, identifying cause-and-effect relationships, comparing, contrasting, finding the main idea, summarizing, making generalizations and predictions, and drawing inferences and conclusions
- (21C), express ideas orally based on research and experiences
- (21D), create written and visual material such as journal entries, reports, graphic organizers, outlines, and bibliographies
- (22), Social studies skills. The student uses problem-solving and decision-making skills, working independently and with others. The student is expected to use problem-solving and decision-making processes to identify a problem, gather information, list and consider options, consider advantages and disadvantages, choose and implement a solution, and evaluate the effectiveness of the solution
Materials:
All mini-lessons:
- Painting of the Williams farmstead (included)
- TBH Ransom Williams exhibit: www.texasbeyondhistory.net/ransom/index.html
Mini-lessons 1:
- Sheet of butcher paper or chart tablet paper for T-chart
- Artifacts/Activity Chart (included) for each student or pair of students
Mini-lesson 2:
- One copy of the list of Sections of Painting (included), cut into horizontal strips (with one activity per strip)
- Strips of blank white paper (approx. 3" x 12")
Mini-lessons 3:
- Copy of story, "A Visit with Ransom Williams," (included) to read to class
- Journal books for each student – 1 sheet of colored construction paper and 2 sheets of white per book
- long-arm stapler
- glue
- scissors
- ruler
Activities and Procedures:
Mini-Lesson 1 - Comparing Life in the late 1800's with Life Today: (45 minutes) Students will view the painting of the Williams' homestead showing the property at large and briefly discuss what they notice immediately about the site. The class will divide into pairs to explore the interactive painting and learn about the various activities illustrated there and complete a chart of the artifacts that support those activities. As a class, students will complete a T-chart noting "Things that are like my life" and "Things that are different from my life."
Step 1: Display the painting of the Williams' homestead so that all students can view it at once. Ask students to comment about what they see pictured in the scene. Encourage them to restrict their comments to what they can actually see.
Step 2: Explain that Ransom and Sarah Williams were former slaves who established a farm and raised a family near Austin, Texas. Nearly 150 years later, archeologists excavated this farmstead site and found a wide variety of household and work-related artifacts. They used these and other information to create a picture of what life was like for this particular African American family at the end of the 19th century. (See also the TBH website exhibit.)
Step 3: Ask students, "What can you tell me about the people who lived here?" As students offer their comments, ask them to point to something in the picture that supports their ideas about the inhabitants of this site.
Step 4: Students will work individually or in pairs to complete the artifact chart by clicking on the 9 interactive sections of the painting, reading the descriptions of the activities pictured there, and viewing the evidence: the artifacts that support the activities. Students will be responsible for presenting their section to the class. Students may use the chart to take additional notes on the presentations for the sections they did not research themselves. (Save charts for use in Mini-Lessons 2 and 3.)
Step 5: After research is completed, the teacher will post a large T-chart (chart paper or butcher paper) with the headings "Things that are like my life" and "Things that are different from my life." Students will use the information from their research to create a list of specific similarities and differences to add to the T-chart. Encourage students to refer to artifacts to support their comments. (Keep the chart posted for use in Session 3.)
Mini-lesson 1 Closure: Point out that archeologists use the artifacts they find to construct an accurate picture of the way people lived at a particular place in the past. Ask students to give examples from their research of artifacts found at the Williams' site that helped archeologists understand how the family spent their time. Close the session by asking students what they would have liked or disliked about living on the Williams' homestead in the late 1800's. Encourage students to use specific examples from their research to support their opinions.
Mini-lesson 1 Extension: Look at the Osborne site (Mexican American tenant farmers on an early 20th century cotton farm - www.texasbeyondhistory.net/osborn/) and the Rubin-Hancock site (freed slaves who became landowners in the last part of the 19th century - www.texasbeyondhistory.net/rubin/) on Texas Beyond History. Compare the kinds of artifacts found at those two sites with those found at the Williams' site. Make a T-chart or Venn diagram showing the similarities and differences in life at these three sites.
Mini-Lesson 2 - Making Life at the Ransom Williams' Site Come Alive: (One 60-minute class period or two 30-minute sessions) In small groups, students will compose a "snapshot" illustrating what is happening in a specific section of the painting. Each group will present their "snapshot". Students will change the "snapshots" to "motion pictures" by arranging lines composed by individual students into a script. Then they will present their "motion pictures" to the class for discussion.
Snapshots: A "snapshot" is a frozen picture formed by a person or several people using their bodies as if they were statues. (They may also be called frozen pictures or tableaus.) Planning and performing a "snapshot" gives students an opportunity to explore the activities and emotions of written material and two-dimensional pictures in a three-dimensional way. In addition, "snapshots" can be "brought to life" by adding sound effects, movement and dialogue.
Step 1: Display the painting of the Williams' homestead again. Now that students are familiar with the activities shown in the painting and the artifacts that support those activities, ask them to describe what they might have seen if they were visitors to the Williams' homestead in the late 1800's.
Step 2: Divide the class into four groups. Place the strips of paper with sections of the painting on them upside down on the table or desk. Let each group draw two of the strips of paper listing the sections of the painting. These will be the parts of the painting that they will use in creating their snapshots.
Step 3: Planning the "snapshot" (10 - 15 minutes): Each group will design a "snapshot" showing their two activities listed on their strips by posing their bodies in different ways. For example, the "sewing" activity could be portrayed by sitting in a chair, pretending to draw a needle and thread through imaginary cloth. Every student in each small group should be posed in a different way, modeling the use of one or more of the artifacts. (Students may be showing the same activity at different stages.) Remind the students to think about how the person might be feeling and show that with their facial expressions.
Step 4: Practicing the "snapshots": When every group is ready, stage a group practice. Assign each group to a specific place around the room. At the teacher's signal ("Action"), every student assumes his/her pose and freezes. After they have held their poses for several seconds, tell students they may relax their faces, but continue holding their poses and look at the other students in their group. Call "Curtain" and allow the groups several minutes to discuss their "snapshots" and make any changes they want in the poses. Then stage another quick practice.
Step 5: Presenting the snapshots: Groups will take turns presenting their "snapshots." (Remind students that if they start feeling uncomfortable, they may break their pose, relax and then resume the pose.) The other students will observe the "snapshot" and discuss what they see.
Step 6: Questions to guide the discussion: What activities do you see going on in this picture? What artifacts are being used? How do the people seem to feel about what they are doing?
Step 7: Making the snapshots into "motion pictures": Give each student two strips of blank paper approximately 3" x 12" on which to write two lines of dialogue. Ask students to think about the person they were portraying in the snapshot. Was the person a boy or a girl? About how old was the person? Was the person one of the Williams' family members or a visiting friend or relative? What might that person be saying while they are doing the activity shown in the "snapshot"? Independently, each student will write two lines of dialogue, one on each strip of paper, that his/her person might say in this situation. (Depending on student experience, the teacher may want to briefly discuss some of the differences in the way people would have communicated in the late 1800's. For example, children would not have called adults by their first names, ordered an adult to do something or spoken disrespectfully to an adult. Adults would not have hesitated to correct children even if they were not the child's parent.)
Step 8: After students have finished writing their two lines, they will work together to organize all the group members' lines into a brief script. Use masking tape to connect the strips of paper and post the script where all of the group members can see it. Allow students 10 – 15 minutes for students to organize their script and rehearse their parts together. Students should add motion appropriate to the scene and may also add sound effects.
Step 9: Present the "motion pictures." Students strike their poses on "Action," begin their dialogue on "Sound" and end on "Curtain."
Mini-Lesson 2 Closure: Point out that archeologists are not interested in artifacts as individual items as much as they are interested in using artifacts to create an accurate story about the lives of people who occupied a specific site. Close the session by asking students what they would have liked or disliked about living on the Williams' homestead in the late 1800's. Encourage students to use specific examples from their research and the snapshot to support their opinions.
Mini-Lesson 2 Extensions:
- Share chapters of Sarah, Plain and Tall (turn-of-the-century-family on a Great Plains farmstead) or The Evolution of Calpurnia Tate (affluent turn-of-the- century family living in a small town in central Texas) to compare the lives of other children living about the same time with the lives of the Williams children.
- Research children's toys or chores from the late 1800's.
- Listen to music from the period.
Mini-Lesson 3 - Growing Up on the Williams' Homestead: (90 minutes or two 45-minute sessions) Students will listen to a story based on the Ransom Williams farmstead painting and create illustrated journals containing four journal entries written as if they were one of the Williams children living on the homestead in the late 1800's.
Step 1: Display the picture of the Williams' homestead. Ask students to point out places in the painting where the artist uses information that archeologists had uncovered at the site to make the picture an accurate "snapshot" of life on the Williams' farm. How is the artist's work similar to the task of the archeologist? How is it different? (Students should understand that both the artist and the archeologist are working with the artifacts and features found at the site to construct a fact-based interpretation of the life of the occupants of a site. The archeologist must stay with data-supported conclusions and acknowledge areas where there is not enough information to make valid inferences. The artist may use imagination to fill in the gaps.)
Step 2: Remind students that the archeologist is always trying to accurately expand the "story" that can be told about people who lived at a site. That "story" is usually told in a formal report that uses the features and artifacts from a site to draw conclusions about the everyday activities of the people who lived there. One of the archeologists who worked on the Ransom Williams' site also used his knowledge of the homestead and his imagination to write a fictional narrative about the Williams' family. Read "An Evening on the Porch with Ransom Williams" aloud to the students.
Step 3: Students will write four journal entries as if they were one of the Williams' children. They may choose between Henry, the 12-year-old boy with the new harmonica, and Mattie, the 10-year-old girl who is inside the cabin helping her mother, Sarah, prepare the evening meal. To plan for their entries, students should make a quick list of activities they have learned about that the children might have witnessed or been a participant in, such as farming tasks, chores, or recreational activities. Variation: Students may write one journal entry and draw one illustration to add to a larger class journal.
Mini-Lesson 3 can be split into two parts at this point, by allowing students to write on their journal entries and saving the construction of the illustrated journals for the second session.
Step 4: Making the illustrated journals:*
Each student will need 1 sheet of colored construction paper, 2 sheets of white construction paper, glue and scissors. Students will fold all of their sheets of construction paper in half to form the pages of a 6" x 9" booklet. On one half of the colored sheet, students will use a ruler to draw a rectangle almost as large as the half sheet. (Leave a ¾ to 1" margin.) Using scissors, students will cut out the rectangle, leaving the margins to form a frame. Use the long-arm stapler to staple all three sheets of paper together on the center fold. Stick the frame (colored paper) to the first sheet of white paper by putting a thin line of glue around the back of the frame and pressing it to the white paper. Students should have three half-size pages of white paper to write on and a white space on the front cover of their books.
*Faster variation: Fold and staple the booklet without cutting a frame from the front cover. Cut white pieces of construction paper (4" x7") for students to use to draw an illustration that can be glued on the front cover. OR decorate the front cover with the student's name and the title "Journal."
Step 5: After the students' rough drafts have been edited, students may copy their entries into their books. Entries may include illustrations. Students may date their entries using dates from the spring and summer of a specific year in the 1880's. The cover may be illustrated with a drawing of Henry or Mattie or a scene that is included in the journal.
Mini-Lesson 3 Closure: Stage a museum walk. Students display their journals on their desks and walk around the class "museum" reading classmates' journals. Hold a journal reading and allow each student to choose their favorite entry to read aloud to the class.
Mini-Lesson 3 Extension:
- Explore the Rubin-Hancock site on Texas Beyond History (www.texasbeyondhistory.net/rubin) to learn about another African American family who lived in the Austin area during the same time period.
- Read aloud Picking Peas for a Penny or Dancing with the Indians by Angela Shelf Medearis.
- Research the types of tools used in farming in the late 1800's.
- Listen to popular music from the late 1800's.