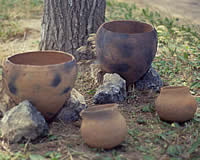
University of Texas at Austin wordmarkCollege of Liberal Arts wordmark
Texas Beyond History
TBH Home
Plains Villagers Main
Photo of closeup view of a cordmarked pot in the process of construction

In this exhibit:

 
drawing of Borger Cordmarked Pottery
Floyd Studer drawing of a Borger Cordmarked pottery vessel found at Ruin 55 at Coetas Creek. Courtesy of the Panhandle Plains Historical Museum.
Flared rim cooking vessel
Flared rim Borger Cordmarked vessel as found in place at Alibates Ruin 28 outside one of the main room blocks. The flared rim made it easy to secure a rawhide cover by tying it down around the neck with a cord or thong. Courtesy of the Panhandle Plains Historical Museum.

Borger Cordmarked jar
Replica of a Woodland Cordmarked conical vessel. These large, heavy vessels were probably used mainly for storage, rather than cooking.
paddle to the pottery
Wrapping the paddle with a fiber cord keeps the bone or wooden paddle from sticking to the wet clay during manufacture.
Borger Cordmarked jar
Borger Cordmarked jar from Antelope Creek culture. Courtesy Panhandle Plains Historical Museum.
Lynn collecting clay
Alvin Lynn collecting clay exposed in the wall of one of the deep canyons of the Canadian River and its tributaries in the Texas Panhandle.

Pottery making is one of the hallmarks of early village life around the world, a technological development that allowed the creation of cooking and storage containers out of mere mud and fire. In the course of human history, ceramic technology—the use of heat to transform clay into an almost infinitely variable material—was a critically important achievement that led to metallurgy, concrete, and, more recently, silicon chips. But the adoption of ceramic technology began with a more modest step in most areas of the world—making simple earthenware pottery.

The basic process of making earthenware pottery was much the same for people all across the world, but each group had its own style and learned to use the clays and materials near at hand. In this exhibit we focus on the particular raw materials, techniques, and vessel forms typical of the Antelope Creek peoples and their neighbors in and near the Texas Panhandle over 500 years ago.

Borger Cordmarked Pottery

Around 900 years ago (A.D. 1100) the Plains villagers who lived along the Canadian River in the Texas Panhandle developed a distinctive style of earthenware pottery that archeologists today call Borger Cordmarked. The pottery style is named for the town of Borger, which overlooks the Canadian River valley in Hutchinson County, an area where many Antelope Creek villages once stood. The exterior surface of a cordmarked pot has hundreds of parallel indentations—cord impressions—left by the use of a cord-wrapped paddle in concert with an anvil stone. During pottery making, the small, rounded anvil stone was held on the inside of a pottery vessel while the force of the paddle on the outside compacted and shaped the clay wall in between. This technique allowed the villagers to create globular (shaped like a globe) cooking pots or jars about 1-foot high with thin strong walls such as those shown here. These were ordinary utilitarian vessels—fire-proof cooking containers used to boil and stew a variety of foods—not fine wares intended for ritual or trade.

Borger Cordmarked-style pottery is best known from a 100-mile stretch of the Canadian River and its tributaries in what is today the north-central part of the Texas Panhandle. It was made between about A.D. 1100 and A.D. 1450 by the peoples known to archeologists as the Antelope Creek culture. Very similar pottery was also made by related Plains Village peoples living in southeastern Colorado, southwestern Kansas, and the Oklahoma Panhandle. Their pottery was a localized variety that was part of a widespread tradition of making cordmarked earthenware shared by many of the villagers of the southern and central Great Plains and their predecessors. The earliest examples of cordmarked pottery in the region date to the early centuries A.D. during the Plains Woodland period (ca. A.D. 200-1100). Some of the latest examples come from historic Pawnee sites along the Republican and Loop Rivers in Kansas and Nebraska dating to the 1700s.

In North America, the technique of making cordmarked pottery appears to have originated in the eastern U.S. prior to 1000 B.C. In the central part of the country, the cordmarked pottery tradition occurs in the upper Midwest around 500 B.C. By the early centuries A.D. pottery-making cultures were spreading westward up the wooded lower valleys of the eastward-flowing tributaries of the mighty Mississippi in what is today Missouri, eastern Kansas, and eastern Oklahoma. From there, the Woodland peoples and their cordmarked pottery tradition spread to the west and northwest up the rivers and onto the Great Plains, including much of the Texas Panhandle. During this period Plains Woodland peoples were experimenting with agriculture and more settled life. The more sedentary lifestyle allowed people to experiment with new technologies such as pottery making.

The Woodland period cordmarked vessels were very large—up to 2 1/2-feet high—and had thick walls and conical shapes (with pointed bottoms like an inverted cone). These seem to have been used primarily as storage containers and were quite serviceable; however, they were prone to break and too heavy to haul very far. Compared to storing food in underground storage pits, ceramic pots must have been a big improvement.

The form of cordmarked pots evolved through time, and by the Plains Village period (ca. A.D. 1100-1450) potters had learned to make much better pottery that had strong, thin walls and pleasingly round shapes. Functionally, the emphasis had changed from storage to cooking vessels. The rounded thin-walled form with a partially constricted opening provided a good trade-off between volume and weight. Round-based pottery could be placed directly on wood or dung fires and, if necessary, easily steadied with three small stones.

Village potters experimented with different rim designs—straight rims, flared rims, and collared (thickened) rims—and sometimes added decorations such as incised lines and fingernail impressions around the rim and neck. Localized variations across the southern and central Plains show that different groups were developing their own unique styles. For example, the Buried City villagers who lived along Wolf Creek in what is today the northeast corner of the Texas Panhandle often smoothed over the cordmarks and liked to decorate their pots with incised lines, impressions, and punctations. They also liked to use crushed scoria (red porous volcanic stone) and sometimes bone for temper.

Why cordmarking? The paddle and anvil method allows the potter to create strong, thin-walled vessels. Wrapping the paddles with fiber cords prevents bone or wooden paddles from sticking to the wet clay, the primary virtue of the technique from a potter's perspective. The cordmarks created small, parallel ridges that were oriented vertically and ran from the top of the vessel through the midsection. The cordmarks on the lower body and base overlap. The tiny ridges may have helped strengthen the characteristically thin vessel walls—often as thin as 2-4 mm (1/16 to 1/8 inch). But the cordmarked surface was advantageous for two other reasons—handling and heating.

The rough surface of a cordmarked vessel provided a good grip for what otherwise might have been a slippery vessel, especially when buffalo bones were boiled to extract grease. This messy process created black-sooted and stained cooking vessels—the Borger Cordmarked pottery found by archeologists is almost always darker in color than the freshly made replicas shown in this section.

Cordmarking also creates more surface area and thus allows more effective transfer of heat (energy) from a cooking fire to the contents of the pot compared to a vessel with a smooth exterior.

Learning to Make Cordmarked Pottery

About twenty years ago Panhandle native Alvin Lynn set out to learn how Borger Cordmarked pottery was made from start to finish. By doing so he hoped to gain insight into the lives of the Antelope Creek villagers who once made this pottery. So he embarked on his own program of "experimental archeology"—replicating the ancient technology using materials and tools that would have been readily available. Below is a step-by-step guide to making cordmarked pottery as developed by Lynn. But before we start, let's meet the man.

Alvin Lynn was raised on a ranch and farm near Matador, Texas, in the southeastern part of the Panhandle in the broken country of the Rolling Plains. Early on he became fascinated with the land, its rocks and its people, past and present. In college, he majored in geology and history at West Texas State University at Canyon and took classes from Dr. Jack Hughes. After college, he married and became a high school science teacher in Dumas, Texas.

A wedding gift of black polished pottery from Santa Clara Pueblo in north-central New Mexico inspired Alvin Lynn to learn how to make pottery. He spent 10 years developing his skill as a potter, studying with famed Santa Clara potters Barbara Naranjo and Madelene Tafoya. Pottery making, he learned, was experimental by nature and required a great deal of practice and experience to perfect. Gradually he became an accomplished potter, making Southwestern-style pottery which he gave to friends and sometimes sold.

Lynn became interested in learning how to replicate Borger Cordmarked after he joined the Panhandle Archeological Society and began volunteering on weekend archeological digs led by Hughes. Pottery sherds were a common find, but no one seemed to know much about how cordmarked pottery was made. So Lynn began carefully studying pottery samples from Antelope Creek sites looking for clues. He showed several partial Borger Cordmarked vessels to his teachers at Santa Clara and they made several helpful suggestions as to how he might proceed. The rest has been trial and error.

Over the last 20 years, Alvin Lynn has made dozens of cordmarked pots and put on many pottery-making demonstrations at museums, public schools, and archeological field schools. His replicas are used by researchers and museums to help bring to life the art and craft of pottery making. His work has been featured in newspapers, magazines and TV shows.

Jewel Baker cleaning a pot
Jewel Baker cleaning a large Borger Cordmarked pottery vessel excavated by the WPA, January, 1939. Courtesy of the Panhandle Plains Historical Museum.

Click images to enlarge

Cordmarked pottery
Replica of Borger Cordmarked pottery.
replicas of cordmarked pottery
Replicas of two large, conical cordmarked storage vessels typical of the Woodland period and two smaller globular Borger Cordmarked cooking jars typical of the Antelope Creek villagers.
Borger Cordmakred jar
Borger Cordmarked jar from Antelope Creek culture. Courtesy Panhandle Plains Historical Museum.
Close-up view of the texture created by cordmarks on an ancient pot
Close view of the cordmarks on an ancient pot.
Photo of cord-wrapped paddle
Replica of a cord-wrapped paddle to which an antler handle has been added. Given the scarcity of archeological examples of bone paddles, Antelope Creek potters may have used mainly wooden ones.
 
Alvin Lynn
Alvin Lynn with examples of the finely crafted pottery he has made. He holds a highly polished black pot made in the style of Santa Clara Pueblo, where he studied. At his feet are replicas of the cordmarked pottery found in the Texas Panhandle (all except the polished bean pot on the far right).
Photo of clay being mixed and kneaded
Photo of vessel being formed with cord-wrapped paddle
Photo of vessel during firing stage

Step-by-Step

Successful pottery making requires skill, knowledge, and experience. The process begins with the gathering and preparation of the raw materials and, for beginning potters, making a good set of pottery-making tools. Material and tools in hand, the potter carefully forms the vessel while the clay is wet and then allows it to dry thoroughly. A week or so later, the pot is fired. If the steps are followed properly and all goes well, the result is a well-fired earthenware pot suitable for cooking and/or storage.

This photographic gallery shows each step of the process and several variations. Note that the images were taken during several different pottery-making episodes.
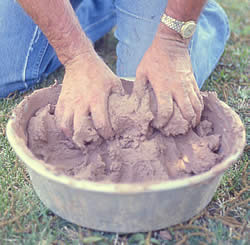
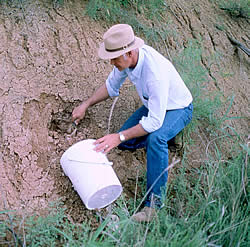
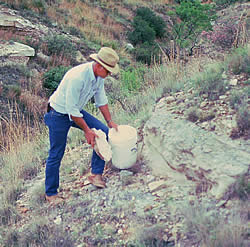
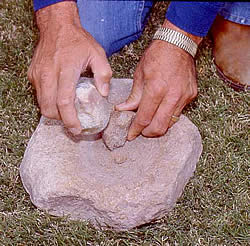
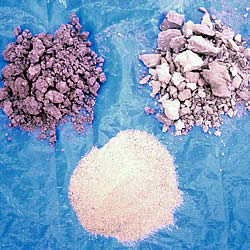
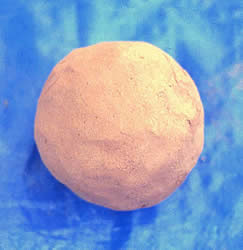
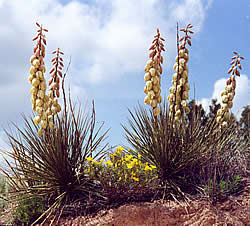
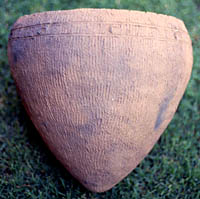

(1) Preparing the Raw Materials

Borger Cordmarked, like virtually all earthenware pottery, is made with three main ingredients—clay, temper, and water.

The Texas Panhandle is blessed with at least four different geological formations that contain pure clay deposits suitable for pottery making. Other secondary clay sources can be found along the Canadian and its tributaries, but these clays are often impure and more difficult to use. From oldest to youngest, the main sources include the red clay of the Permian Redbeds, the yellow to red clays of the Tecovas and Trujillo Triassic-age formations, the brown to bluff clays of the Ogallala Pliocene-age formations, and the dark gray and blue clays from the shallow playas dating to the Pliocene and Pleistocene. All but the playa clays are exposed in the canyon walls of the Canadian Breaks. While good pottery can be made from all four sources, each clay has its own peculiar properties and must be prepared somewhat differently. For instance, the Permian red clay contains lots of salt and gypsum, minerals that often cause pottery to explode or break apart during firing. Removing the mineral inclusions is a tedious and time-consuming process. The younger clays are easier to use and require less preparation.

For all the clays, the most dependable preparation method is to dry the clay thoroughly and then pulverize it and carefully search for rootlets, pebbles, and other impurities. Sometimes these impurities are removed by screening or filtering after the clay is rehydrated by adding water and allowed to sit overnight. Moist clay is "plastic"—easily shaped into almost any form, but this plasticity comes at a cost. Pure clay may be too flexible to hold its shape and it shrinks and cracks as it dries. Therefore, "temper"—nonplastic material such as sand, volcanic ash, crushed rock, crushed pottery (grog), bone or shell—is often added. Without temper, clay forms flat platelets that tend to trap and hold water; temper particles disrupt the clay platelets and allow the walls of the vessel to dry more completely. Different types of clay and different types of temper must be mixed at various ratios to obtain a workable pottery clay. Typically the amount of clay varies from 50-70% and the amount of temper from 30-50%. In Borger Cordmarked pottery, micaceous sand and crushed quartzite are the two most common tempers.
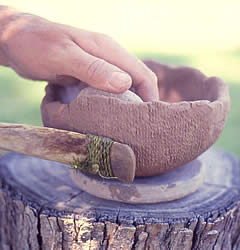
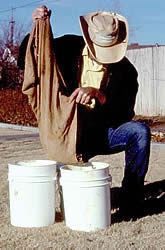
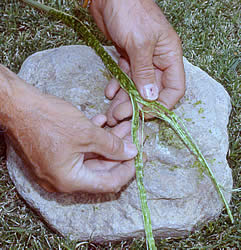
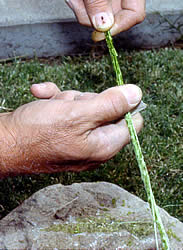
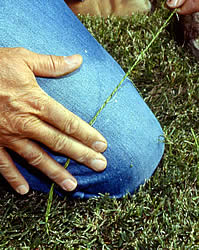
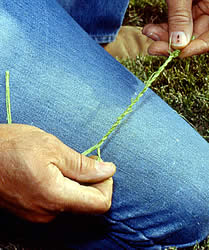
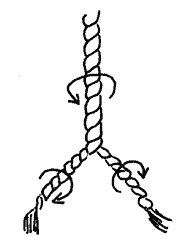
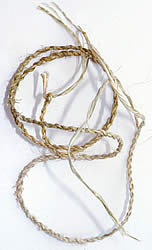
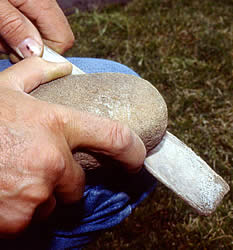
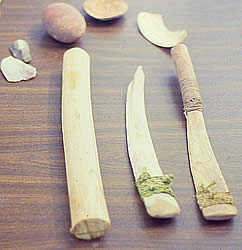
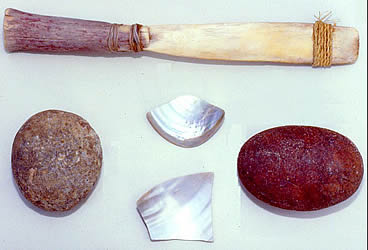
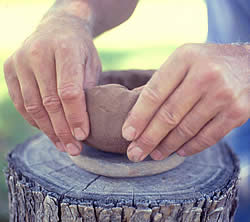
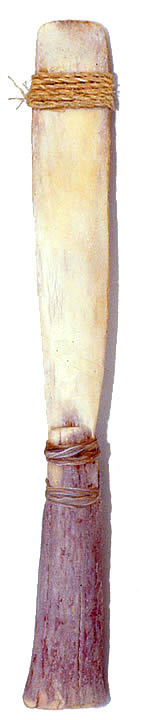
collecting clay
Alvin Lynn collects clay from a natural exposure along Blue Creek near its confluence with the Canadian River. Note the cracked appearance of the clay, caused by shrinking during drying. Moist, freshly exposed clay has bright colors, while the dried clay visible here has a dull appearance. This particular clay comes from the Tecovas formation.
collecting volcanic ash
Materials suitable for tempering can be found along exposed formations in the Canadian Breaks of the Texas Panhandle. Here Lynn gathers chunks of volcanic ash. Other locally available temper materials include micaceous sand and quartzite.
crushing stone
Crushing an old quartzite boiling stone with a hammerstone. Pulverized quartzite is one of the most common tempering materials used in Borger Cordmarked pottery. A raw quartzite pebble is tough and difficult to crush, but pebbles that have been used for stone boiling break apart readily. Many Plains Indian groups used stone boiling as a favored cooking technique.
raw materials
Raw materials: two kinds of dried clay and pulverized volcanic ash (lower).
dried clay poured into a bucket of water
Pulverized dried clay is poured into a bucket of water. Left overnight, the clay will hydrate (absorb water).
filtering the clay
Mixing the clay and temper to form the prepared clay is similar to kneading dough in bread-making. The clay mixture must be consistent and free of air pockets. If it is too wet, the clay won't hold a shape; if too dry, it cracks and can't be shaped.
 

The clay mixture must be consistent and free of air pockets. If it is too wet, the clay won't hold a shape; if too dry, it cracks and can't be shaped.


mixing clay and temper
Mixing the clay and temper to form the prepared clay is similar to kneading dough in bread-making.


Once mixed, pottery clay improves with aging but can be used right away if you don't have time to wait.


(2) Making the Tools

A potter, just like any craft specialist, needs a good set of tools. The tools needed to make cordmarked pottery include containers for gathering, carrying, and mixing the raw materials; crushing tools for pulverizing clay and temper; and shaping tools for working the wet clay. The shaping tools—cord-wrapped paddles, anvils, scrapers, and polishing stones—were probably prized possessions handed down from mother to daughter.

We don't know for certain that the prehistoric potters during the village period were female, but this was very likely the case based on early historic accounts from the Southwest and the Plains. Men's and women's roles are dictated by custom in most traditional societies. As Barbara Naranjo from Santa Clara Pueblo teased: "Men don't like to get their hands dirty." This attitude has changed in recent decades as pottery making has become a successful commercial venture for many Indian groups in the American Southwest.
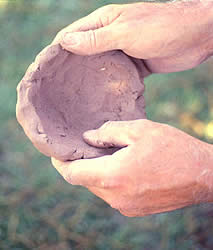
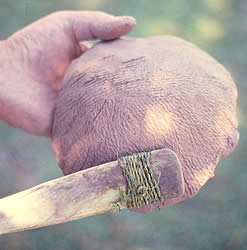
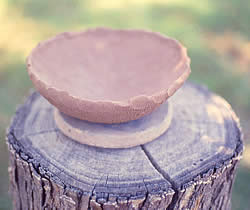
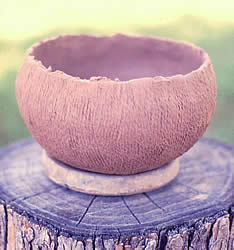
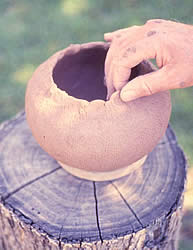
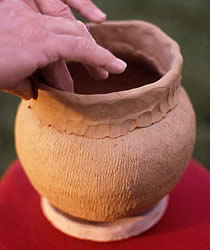
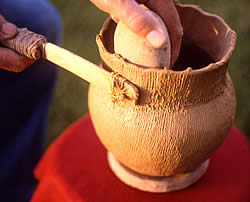
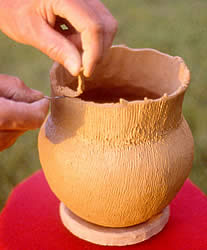
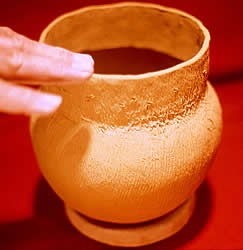
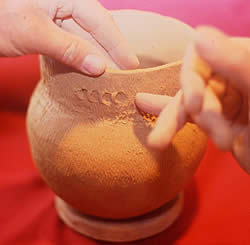
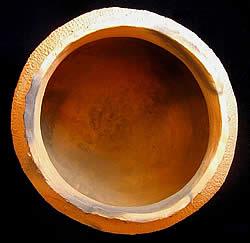
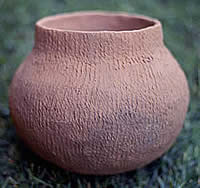
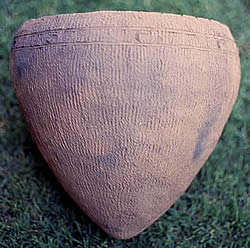
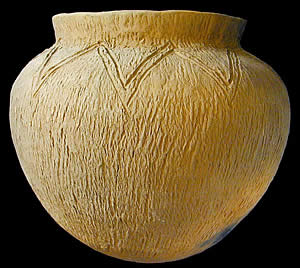
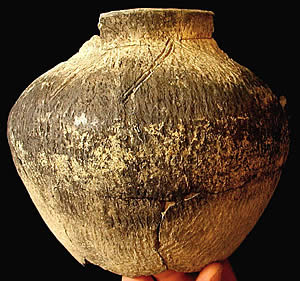
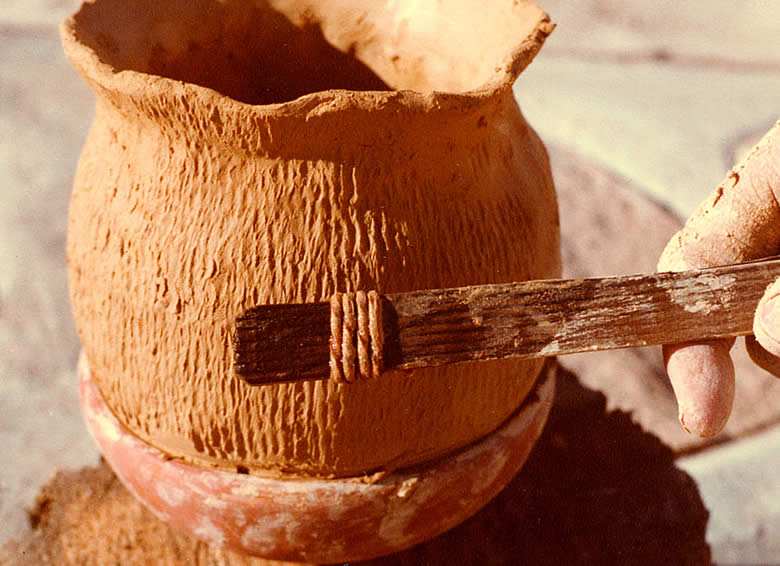
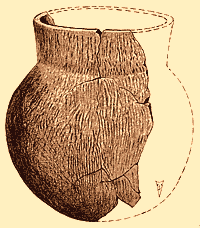
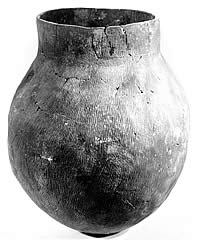
yucca plant
One of the best natural sources of plant fibers suitable for making cord is the yucca plant, several species of which are common in the Texas Panhandle. These yucca plants are flowering after a spring rain; the flowers are a delicacy and are a favorite food for insects, animals, and humans. Photograph by Kris Erickson.
separating yucca fibers
Yucca fibers are separated by pounding a yucca leaf until the individual fibers can be pulled apart.
yucca fibers
Individual yucca fibers are not particularly strong, but when woven together, make a very tough cord.
scrapping fibers
The fibers are scraped with a flint flake to remove the soft fleshy parts of the yucca leaf or "spear."
twisting yucca fibers
Each strand is formed by twisting together a small bundle of yucca fibers, gradually adding new, overlapping fibers to lengthen the strand. Each strand has a S-twist pattern.
z-twist method
The cord is formed by wrapping together two S-twist strands of yucca fibers using the Z-twist method (see diagram).
z-twist diagram
Careful examination of the cord impressions on ancient pottery showed that the cords usually were made of two S-twist strands woven into a single cord using the Z-twist method, one of the most common cord-making techniques. The Z-twist prevents the two strands from unraveling.
finished yucca cord
A finished yucca-fiber cord is strong and highly durable. The Plains villagers of the Texas Panhandle probably used yucca cords and ropes for many purposes, but the cord impressions on pottery are practically the only surviving evidence of this perishable organic material.
shaping bone
Paddles could be fashioned from wood or bone. Here, the rib bone of a cow is being shaped by a grinding stone. Plains villagers had ready access to the bones of their favorite prey—buffalo. Because archeological examples of paddle-like bone tools are rare, it is likely that most paddles were made of wood.
cord-wrapped paddles
Here are several newly made cord-wrapped paddles along with other tools.
pottery toolkit
A toolkit for making cordmarked pottery includes a finished paddle (a deer antler handle has been added), anvil and grinding stones, and shaped mussel shell fragments for scraping, smoothing, and trimming. Such toolkits must have been highly valued by prehistoric potters and probably passed from mother to daughter. (We don't know for certain that the potters were women, but ethnographic accounts from the Southwest and the Plains strongly suggest that was the case.)

(3) Forming the pot

Careful examination of potsherds and partial vessels found by archeologists at Plains Village period sites reveals many clues as to how cordmarked pottery was made. Other clues come from ethnographic accounts and plain old trial and error. While there is more than one way to achieve similar results and many minor variations, the process of cordmarked pottery making is now well understood.

Manufacture begins by forming the base of the pot and letting it begin to dry. As it dries the base of the pot becomes strong enough to hold the weight of added clay. The body of the pot is formed by gradually adding rope-like clay coils one at a time. These are shaped by hand and then welded into place with a cord-wrapped paddle and anvil. Gradually smaller coils are added until the "neck" is created, followed by a rim. Once the rim is trimmed, the vessel is ready for decoration, if desired. The completed "greenware" pot is allowed to dry for several days or a week before it can be fired.

One step that is not shown below is using a mussel shell scraper on the interior of the vessel to thin the walls. This is done after paddling has mashed the coils together. Scraping removes or obscures most of the anvil marks and results in thinner, more even walls. Archeological examples of pottery with obvious anvil marks show that scraping was not always done by prehistoric potters.
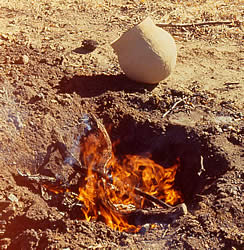
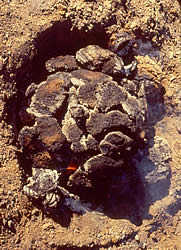
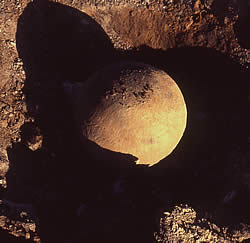
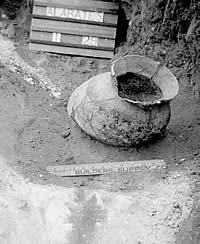
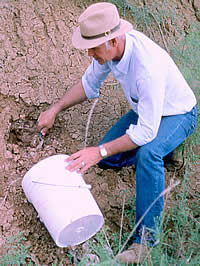
forming the pot
The base of the pot could be formed in several ways. Here a mass of clay is being shaped by hand into a shallow bowl shape. The base of the pot is critical because its size and shape largely determines the final size and shape of the finished pot.
paddling the clay
Once formed, the bowl-shaped base is paddled against a stone anvil (not visible) held on the inside of the vessel. Paddling consolidates the clay and thins the vessel walls.
drying the base
The base is allowed to partially dry so it will be strong enough to hold the weight of the pot as it is built, coil-by-coil. In this example the base has been placed on a ceramic disk called a "puki," which allows the potter to freely turn the vessel as it is made. This is a Southwestern technique and was probably not used by Plains Villagers.
building the walls
The vessel walls are built gradually by adding "coils" of clay—rope-like pieces of clay shaped by hand. As each coil is added, it is pressed by hand into place.
building the walls
The cord-wrapped paddle and anvil squeeze the clay coil, welding it into place and thinning the vessel wall. This paddling action also removes any air pockets.
building the walls
After one or two coils are added, the vessel is allowed to partially dry; otherwise the moist clay walls would collapse. In hot, dry conditions, the clay dries fairly quickly and the pot-making goes faster. In cooler and wetter conditions, it may take two days to finish a pot because of the slow drying times.
creating the shoulders and neck
The "shoulders" and "neck" of the pot are formed by adding smaller and smaller coils and gradually building the pot inward and upward. Note that the upper edge or "lip" of the pot must be damp so it will bond properly with the next coil of clay. Sometimes it is necessary to cover the lip with a damp cloth while the newly applied coil dries.
forming the rim
Once the body of the vessel is complete, the rim is formed by adding a thick coil which is shaped first by hand.
paddling the rim
Here the rim is thinned and welded to the neck by paddling.
trimming excess clay
A sharp flint flake (or mussel shell tool) is used to trim off excess clay and create a uniform rim.
decorating the rims
The rim must be smoothed carefully with a wet finger to avoid the formation of vertical cracks in the rim as the vessel dries.
Adding a design composed of fingernail punctations
The Buried City Plains Villagers along Wolf Creek made pottery very similar to Borger Cordmarked, but often added simple designs such as this row of fingernail punctations.

(4) Firing

Successful pottery firing requires controlled conditions. Calm, warm days are greatly preferred over windy or rainy days, especially during the cool times of the year when a cold gust of air can shatter a pot during firing. Cordmarked pottery was made in simple open fires, not in special pottery kilns. The firing temperatures were relatively low—perhaps 500-700° F, a temperature range easily reached by an open fire. Many kinds of organic materials can be used to fire pottery. Of those readily available to Plains Villagers of the Texas Panhandle, brush and dried bison dung were probably the main fuels.

"You never know if you'll have a pot until you fire it." -Alvin Lynn

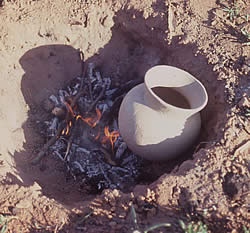
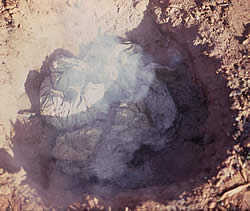
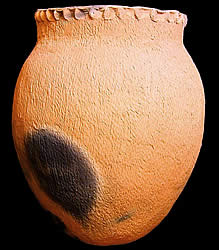
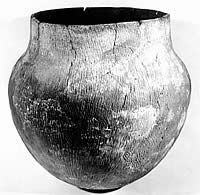
The firing sequence involves preheating the pottery vessels and then covering the pots with combustible material so that an even fire is created that completely envelops the pottery vessel. Fires that freely allow oxygen to reach the vessels will create light, bright "oxidized" colors. When oxygen is cut off by smothering the fire or by tightly covering the hot pottery, the clay turns dark gray or even black from unburned carbon. Localized dark patches called "fire clouds" result from direct contact with incompletely burned fuel (or another pot).
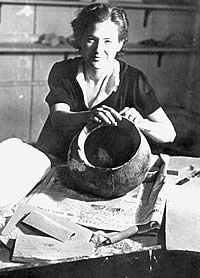
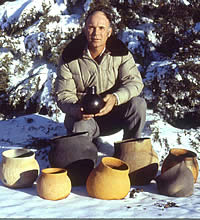
beginning to fire
Firing begins by digging a small pit (optional) and building a wood fire. The unfired vessel, which has been allowed to thoroughly dry for a week, is placed near the fire so it will warm gradually.
warming the pot
As the pot warms it is rotated and gradually placed closer to the fire. Thermal shock caused by an abrupt change in temperature can break or even shatter the vessel.
add cow patties
When the fire has burned down to coals, dried cow patties are added to provide an even layer of combustible material.
placing the pot on the cow patties
The pot is placed directly on the burning cow patties, upside down, and quickly covered with an even layer of patties.
ash cooling the pot
The cow manure burns relatively hot and fairly fast—within an hour the combustible material has completely burned, leaving a thick layer of ash over the cooling pot. If the ash layer is disturbed by a gust of wind or a sudden downpour, the exposed pot will cool too quickly and often crack due to thermal shock.
cooling the pot
After the pot has cooled, the dung ashes are raked off and the finished pot emerges. If enough oxygen reaches the pot during firing, it will develop clear, bright, earthy colors, such as those of this pot. In contrast, if the supply of oxygen is reduced by covering the fire with a layer of fine dung powder, the pot will turn dark from the unburned carbon.
base of finished pot
A finished replica of a Buried City style conical cordmarked cooking vessel. Note the fire clouds.
mouth of finished pot
Mouth and interior of a Buried City style conical cordmarked cooking vessel.
finished jar
Base or bottom of a Buried City style conical cordmarked cooking vessel. Fire clouds, such as those shown here, are caused by direct contact of the fuel and the pot.
finished pot
A finished replica of a Borger Cordmarked cooking jar. From start to finish the process has taken about nine days. In warm, dry weather the time could have been cut in half, but it is always a slow process. Most likely the prehistoric potters made and fired several vessels at time, knowing that all might not survive the process.

These replicas of cordmarked pots illustrate the evolution in the most common vessel forms. The large conical storage vessels (on right) typical of the Woodland period gave way to the smaller globular Borger Cordmarked jars (on left) typical of the Antelope Creek peoples.

finished pot
A finished replica of a Woodland Cordmarked conical vessel that is about three times larger than the cooking jar on the left. These large, heavy vessels were probably used mainly for storage of perishable food items, like dried corn or beans, rather than cooking.

Credits and Sources

This exhibit was developed by Alvin Lynn and Steve Black and is based in part on a 1982 graduate class paper written by Lynn for Dr. Jack Hughes at West Texas State University that is entitled "Replication of Cordmarked Pottery." Black also interviewed Lynn. Lynn made all of the replicas shown in this exhibit and provided most of the photographs. All of the photographs of pottery making were taken by Alvin and Nadyne Lynn. Archeologists Chris Lintz and Doug Boyd reviewed the exhibit draft and provided helpful comments.

Dockstader, Frederick J.
1972 Naked Clay: Unadorned Pottery of the American Indian. Museum of American Indian, Heye Foundation. New York City.
[Book with many photographs of prehistoric pottery; also shows the Catawba Indians of South Carolina using the coil method of pottery making.]

Hyde, Hazel
1973 Maria: Making Pottery. The Sunstone Press. Santa Fe, New Mexico.
[Simple but Informative picture booklet on the techniques of Maria Martinez.]

LeFree, Betty
1975 Santa Clara Pottery Today. School of American Research and the University of New Mexico Press, Albuquerque.
[Pictorial and written history of pottery making at Santa Clara Pueblo, where Alvin Lynn studied.]

Perttula, Timothy K. and Christopher Lintz
1995 Prehistoric and Protohistoric Ceramics from the Lower Plains, Caprock Canyonlands, and Texas Panhandle. Bulletin of the Texas Archeological Society 66:203-210.
[This excerpt from an article reviewing Texas' aboriginal ceramics can be downloaded in PDF format, courtesy Texas Archeological Society.]

Peterson, Susan
1977 The Living Tradition of Maria Martinez. Kodansha International. Tokyo, New York & San Francisco.
[Pictorial and written account of the most famous of modern Pueblo potters.]

Rhodes, Daniel
1973 Clay and Glazes for the Potter. Chilton Book Company. Radnor, Pennsylvania.
[Good technical reference book.]

Suhm, Dee Ann, Alex D. Krieger, and Edward B. Jelks
1954 An Introductory Handbook of Texas Archeology. Bulletin of the Texas Archeological Society 25.
[Contains the first formal definition of the Borger Cordmarked pottery type. The 1962 revised type description can be downloaded in PDF format, courtesy Texas Archeological Society.]

Wirt, Sharon
1984. American Indian Pottery. Hancock House Publishers. Blaine, WA.
[Shows various styles of pottery construction including the replication of cordmarked Woodland pottery.]

Links

http://www.acers.org/cic/cLinks/clinks.asp
There is abundant information on modern pottery making techniques and supplies on the Internet. A good starting point is the Ceramics Links page created by the American Ceramic Society .

Making your own: The steps outlined in this exhibit can be simplified by starting with commercial potter's clay. You will need to make your own cord-wrapped paddle and find a suitable anvil stone. The only tricky (and potentially hazardous) part is the firing, which should be done with appropriate safety precautions.


replica of cordmarked pottery
A finished replica of a Buried City style globular cordmarked cooking vessel. This style was created by the villagers who lived along Wolf Creek near Perryton, Texas. The Buried City potters often decorated their vessels with incised patterns such as this chevron pattern.
fragment of cordmarked pottery
Large fragment of a partial cordmarked pottery vessel found at Buried City. Alvin Lynn used this archeological find as a model for the replica shown above. Notice the dark sooting from cooking.